Moo Cards and QR Codes
I'm definitely not the first to think of adding a QR code, to my Moo business cards. There are some neat examples out there, including stickers, and mini cards. But how to generate the code, and make sure it works with your phone. I'll briefly go through both steps here.
Background and History: QR Code
From the patent on barcodes in 1948, it was a long road to the first Universal Product Code in 1974. The first matrix (2D) based code appeared in 1992, called Code 1. The QR Code was created by Toyota subsidiary Denso-Wave in 1994. While in 1995, another 2D code, the Aztec code was invented, and published in public domain in 1995. Another popular format is the Data Matrix.
All these standards only define the physical layout of the code (or modules), though. NTT Docomo has established a de-facto encoding standard, and MSKYNET (that name might worry some) has formalized that in the SPARQCode. This standard includes the MECARD from NTT Docomo, and the older vCard business card format.
As the vCard pre-dates the MECARD format, this might be the only supported by older phones. In particular, Nokia has used vCard to exchange phone book information over SMS, IR and Bluetooth for many years. Thus, it might be a safer bet to encode in that. The Android ZXing reader can read both.
Generating the QR Code
There are several QR code generators out there. ZXings own worked well for my purpose. However, by default, it encodes using the MECARD format. That means, you'll first have to generate your information on vCard. There are several of those generators out there was well, but the easiest might just be to look at the documentation on Wikipedia.
The point is, you can cut some of the cruft the generators add. The essential properties include: N, FN, TEL, EMAIL, and URL. In the end, you might end up with something like this. Notice how the name is duplicate in the FN and N attribute. That is to allow different phones to pick up the name regardless of which format they expect.
BEGIN:VCARD

N:Doe;John Michael

FN: John Michael Doe

TEL:+123456789

EMAIL:john@example.com

URL:http://example.com

END:VCARD
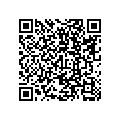
Once you have the vCard encoding, select "Text" contents in the ZXing generator, and paste in the vCard text. Generate a large image. You'll get something like this.
Designing your QR Business Card
The size of the generated image will depend on the amount of information you put in, and the size you choose to generate in. Note that you can manually tweak the URL to Google's Chart API above. The first attribute, chs defines the size pixels (it's always square).
You want your business card to work flawlessly, so it's important to make sure the QR Code is clear. It is done by making it as large as possible, and pay attention to the physical size of each square (module) of the code. At Denso-Wave, they recommend at least 4 dots per module. At 300 dpi, that is 0.33 mm per module.
The size of the business card at Moo is 84mm x 55mm, and the recommended resolution for uploaded images is 1039 x 697 pixels. Taking the trim into account, that corresponds to 300 dpi. Make sure your code does not exceed the trim area, though. It is about 5% on either side, which means you have 939 x 597 pixels left to play with. At four pixels / module, that gives you a maximum size of the code of 149 modules. That is a lot. Increase the size to six, and you're limited to 99 modules. The example above used only 41 modules, and at 350 pixels it had seven pixels / module. That should be picked up relatively easy by all readers.
Reading the code
On the Android phone, you'll find the ZXing app in the Market. Or you can download directly from the source. For other phones, including Nokia, there's the Kaywa Reader. It can be downloaded both directly from your phone, and from their web site.
