Hello World! from the UG-2864 "OEL Display Module" / SSD1306
There is a wide range of cute small OLED (organic LED, aka. Organic Electro-Luminescence) display modules around. Adafruit has a range, the same or similar can also be found all over eBay and Amazon, and of course from DealExtreme. They are available in modules for the Arduino, Raspberry Pi, or other micro controllers. Some are based on basic DATA, CONTROL, LOCK interfaces, while others implement the SPI or I2C bus protocols. The OLED makes for a bright high contrast wide viewing angle screen. Most are monochrome, while a few come with 16 bit colors.
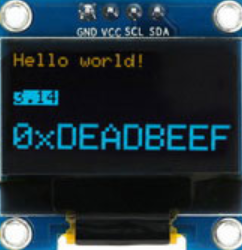
I got the $7 0.96 inch 128*64 pixel I2C version from Deal Extreme. It is indeed small, but also very nice and sharp. Even small fonts are easily readable. It was easy to get up and working with the Arduino UNO, although with a few gotchas to watch out for. The I2C interface makes it very easy to hook up, with only two wires in addition to power (5V and ground).
For background, this GeekOnFire page goes into detail about the memory addressing and low level commands. Further details can be found in the Univision Technology display (UG-2864HLBEG01, UG-2864HSWEG01) and Solomon Systech driver chip (SSD1306) data sheets. See also this note which compares the SPI and I2C protocols.
Scan and Detect
There are also multiple drivers and graphics libraries around, some of which are available directly through the Arduino IDE Library Manager. I'll go through the details below, but before we get there, make sure the module is hooked up correctly and detected. See the Arduino Wire library reference for which pins to hook up. It varies based on Arduino board and version.
Note, for the Arduino Uno, the pins are Analog 4 and Analog 5.
Once plugged in, copy the sketch from this simple I2C Scanner, and upload. Open the Serial Monitor, and observe something like "I2C device found at address 0x3C".
Take great care to note the exact address. It might be either 0x3C or 0x3D, and the libraries below will have to be modified accordingly.
U8glib
The U8glib library supports a long list of different LEDs. It is available directly from within the Arduino IDE Library Manager by searching for "U8glib". Once installed, open the Examples list, and try the "HelloWorld" example.
However, before uploading, you need to uncomment the correct display. In my case, it was around line 90, and looked like:
U8GLIB_SSD1306_128X64 u8g(U8G_I2C_OPT_NONE|U8G_I2C_OPT_DEV_0); // I2C / TWI
Once uploaded, the display should show "Hello World!". Also try out the other examples, like the GraphicsTest, but make sure to always uncomment the correct initialization line.
Adafruit
The Adafruit library focuses on the displays they offer, and comes in two parts, the SSD1306 driver and the Adafruit Gfx library. Searching for "Adafruit SSD1306" and "Adafruit gfx" in the Arduino IDE Library Manager should give perfect hits.
The Adafruit driver and examples take some custom modifications before they work, though. First, in the file Adafruit_SSD1306/Adafruit_SSD1306.h, make sure the following lines are uncommented and correct according to the display you have (see the scanner section above). Make sure the other similar lines above or below are commented out.
#define SSD1306_I2C_ADDRESS 0x3C
#define SSD1306_128_64
Secondly, in the ssd1306_128x64_i2c example sketch, again make sure that the address is defined correctly, according to what the scanner said. Within the setup() method, you will see this line, which you might have to modify:
display.begin(SSD1306_SWITCHCAPVCC, 0x3C);
GeekOnFire
Finally, the GeekOnFire library is yet another easy wait to get started with the OLED display. It is not available in the Arduino Library Manager, but can just as easily be downloaded from their site, and installed from the Arduino IDE through its ZIP file.
As with the Adafruit library, the I2C address has to be modified, and a similar initialization line can be found within the setup() method of their examples:
GOFoled.init(0x3C);